
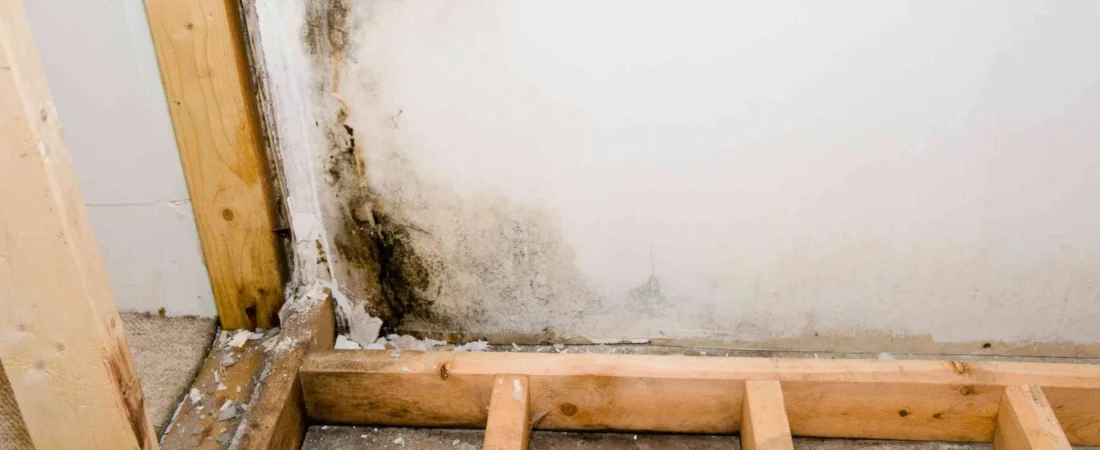
Renovation mold catches people off guard not because it’s rare, but because it shows up after the work looks finished — sometimes weeks later, sometimes months. You fix the bathroom, paint the walls, lay the floors, and then a musty smell creeps in or dark patches appear behind that brand-new baseboard. Here’s the part most articles skip entirely: the renovation itself is often what creates the conditions for mold, not just what uncovers it.
That’s the angle worth understanding. Contractors and DIYers focus on what was hidden before demo — old moisture damage, existing spores behind drywall. But the construction process introduces a surprising amount of moisture all on its own: wet concrete, fresh plaster, damp lumber, and disrupted ventilation paths. Your brand-new renovation can be actively growing mold while still smelling like fresh paint.
Why Does Mold Grow After a Renovation Even When Nothing Was Wet?
Here’s the counterintuitive fact: new construction materials are some of the most mold-friendly surfaces on the planet. Fresh drywall, raw OSB, and new lumber all carry organic compounds that mold spores treat like a buffet. Add relative humidity above 60% for 24–48 hours, and active colonization can begin — no pre-existing leak required.
Renovations also create dust clouds that redistribute existing spores throughout the home. Even if you gut a single bathroom, airborne spores from inside wall cavities can land on damp surfaces in adjacent rooms. That’s how you end up with mold in a bedroom that wasn’t even part of the project.
Disrupted vapor barriers are another overlooked culprit. When contractors cut into walls, they sometimes nick or bypass the vapor retarder — the layer that keeps wall cavity humidity from migrating inward. Once that barrier is compromised, even normal seasonal humidity swings can push enough moisture into new materials to sustain mold growth. The fix looks complete on the surface while a slow problem builds behind it.
What Are the Most Common Causes of Mold After Renovation?
Not all post-renovation mold has the same origin story. Understanding which cause applies to your situation changes everything about how you respond to it.
- Wet materials sealed too quickly. Drywall, plaster, and concrete all need time to cure and release moisture — sometimes several weeks. When contractors hang drywall over freshly poured concrete or apply paint too early, they trap moisture inside. That trapped humidity has nowhere to go except into the organic surfaces around it.
- Leaks disturbed during demo. Cutting into walls occasionally nicks old supply lines or disturbs plumbing connections that were barely holding. A slow drip behind a new wall can go undetected for weeks, quietly soaking insulation and framing before any visible sign appears.
- Pre-existing mold not fully remediated. Some contractors wipe visible mold with bleach and call it done. Bleach kills surface mold on non-porous materials but does nothing for spores embedded in drywall or wood. Those spores reactivate the moment humidity rises again.
- Ventilation removed or blocked. Bathroom fans, kitchen exhaust paths, and attic ventilation are commonly disconnected during renovations and not properly reinstalled. Without adequate air exchange, humidity from cooking, showers, and daily living concentrates exactly where new materials are most vulnerable.
- Improper flashing or waterproofing around new openings. Adding a window, cutting a new door, or installing a skylight creates a new penetration point in the building envelope. Flashing done wrong — or skipped entirely — lets rain and condensation seep into wall cavities over time.
What Are the Warning Signs of Mold After Renovation?
The musty smell is usually the first signal, and it’s worth taking seriously even before you see anything. Mold produces volatile organic compounds (MVOCs) as a metabolic byproduct — those compounds have a distinctive earthy, damp smell that doesn’t go away when you open a window. If a recently renovated space smells like a basement, treat that as a red flag, not a minor annoyance.
Visible discoloration on new surfaces is the obvious one, but the color is often misleading. Post-renovation mold doesn’t always show up as classic black patches. It frequently appears as gray, white, or even pinkish spots on fresh drywall or grout. People mistake early-stage mold for efflorescence, paint bleeding, or simple staining — and lose weeks of response time as a result.
Physical symptoms in occupants are another warning sign that doesn’t get enough attention. Nasal congestion, itchy eyes, and fatigue that improve when you leave the house and worsen when you return suggest an indoor air quality problem. This pattern is particularly telling after renovations because it often develops gradually as mold colonies expand, rather than appearing all at once.
Mold Under wallpaper and beneath new flooring is easy to miss during a visual inspection. If new wallpaper is bubbling, peeling at corners, or showing faint staining through the surface, there’s a real chance mold has established itself on the drywall beneath before the paper even went up.
“The biggest mistake I see after renovations is treating mold as a cosmetic problem rather than a moisture management problem. You can scrub every surface in the room, but if the underlying humidity source isn’t resolved, you’ll have mold again within 30 days. Moisture is always the disease — mold is just the symptom.”
Dr. Patricia Hale, Certified Industrial Hygienist and Indoor Air Quality Specialist
Which Areas of a Renovated Home Are Highest Risk for Mold?
Bathrooms are the obvious answer, but the specific risk zones within a renovation project are more nuanced than that. Wherever two trades intersected — where plumbing met framing, or where new tile met old subfloor — there’s an elevated chance of improper sealing or a trapped moisture pocket.
Basements deserve special mention. Finishing a basement is one of the most mold-prone renovation projects precisely because you’re adding organic materials — drywall, carpet, wood framing — directly against or near concrete walls that naturally wick ground moisture. Concrete is permeable. Even “dry” basement walls pass vapor, and when you put drywall against them without a proper vapor barrier and air gap, you’ve created a mold incubator that looks completely finished and normal from the inside.
Attic spaces adjacent to renovation work also carry risk. If a contractor cut into ceiling joists or repositioned HVAC ducts, warm humid air from living spaces may now have a new path into an unconditioned attic space — where condensation on cold surfaces is basically guaranteed in colder months.
| Renovation Type | Primary Mold Risk Zone | Timeframe for Symptoms |
|---|---|---|
| Bathroom remodel | Behind tile, under subfloor, around plumbing penetrations | 2–8 weeks post-completion |
| Basement finish | Between drywall and concrete walls, under carpet | 1–6 months post-completion |
| Kitchen renovation | Under sink cabinet, behind dishwasher, around window frame | 2–6 weeks post-completion |
| Addition or new room | Roof-wall junction, new window flashing, exterior sheathing | First heavy rain or cold season |
How Do You Find Mold That’s Hidden Inside Walls After Renovation?
The smell test is your best free diagnostic tool. Move through the renovated space slowly, getting close to baseboards, outlet covers, and HVAC vents — mold smell concentrates near gaps where air from wall cavities escapes into the room. If the odor intensifies near a specific wall or corner, that’s where to focus your investigation.
A surface moisture meter (available for under $30 at most hardware stores) can detect elevated moisture in drywall, wood trim, and subfloor without opening anything up. Readings above 17% moisture content in wood or above 1% in drywall typically indicate a problem worth investigating further. These tools won’t find mold directly, but they’ll identify moisture patterns that make mold almost inevitable.
Air sampling is the most definitive non-destructive method. A certified industrial hygienist can pull air samples from a room and have them analyzed for spore types and concentrations — comparing indoor counts to outdoor baseline counts tells you whether you have an active indoor source. This is particularly useful when the smell is present but nothing is visible. Destructive investigation — actually cutting into suspect walls — should come after you’ve narrowed down the likely location, not as the first step.
Pro-Tip: Before opening walls, use a thermal imaging camera (many home inspectors include this in standard inspections) to look for cold spots on wall surfaces. Cold spots indicate evaporative cooling from moisture — a reliable indirect sign of wet materials behind drywall. It won’t confirm mold, but it gives you a precise location to investigate instead of removing random sections of perfectly dry wall.
How Do You Fix Mold After a Renovation Without It Coming Back?
The sequence here matters more than the products you use. Fixing mold without fixing moisture is the single most common reason post-renovation mold returns within months. You can replace every sheet of drywall in the room, but if there’s still a slow vapor path or a drip from a pipe connection, you’ll be back in the same position by next season.
Start by identifying and eliminating the moisture source. This means pressure-testing plumbing if there’s any chance of a leak, checking that all ventilation is correctly reconnected and discharging outside (not into the attic), and measuring ambient relative humidity with a digital hygrometer. If indoor humidity is consistently above 55%, run a dehumidifier while you address the source — don’t wait for humidity to come down on its own.
For the actual mold removal, the approach depends on the material affected:
- Drywall with mold penetrating the paper layer — remove and replace. Drywall is cheap; attempting to clean porous, cellulose-rich gypsum board that’s been colonized is a losing battle.
- Wood framing with surface mold only — HEPA-vacuum, then treat with a borate-based fungicide (like Tim-bor), followed by encapsulation with a mold-resistant primer if the wood is structurally sound. Deep staining or soft spots mean the wood needs to be replaced.
- Tile grout — remove and regrout with an epoxy-based grout that doesn’t absorb water. Scrubbing existing grout only works on very early-stage surface mold.
- Insulation — always remove and replace. Batt insulation saturated with moisture and colonized by mold cannot be effectively remediated in place.
- Subfloor and underlayment — treat the same way as drywall: if mold has penetrated the material, replace it. Wet subfloor that’s been dried and painted over will likely delaminate anyway.
For any affected area larger than 10 square feet, the EPA’s remediation guidelines recommend hiring a professional. That threshold exists because larger infestations produce enough spores during disturbance to contaminate the rest of the home if proper containment isn’t in place — plastic sheeting, negative air pressure, and HEPA filtration are standard professional tools for a reason.
Who Is Responsible for Mold Found After a Renovation?
This is where things get genuinely complicated, and the honest answer is: it depends on the situation. Mold after renovation in a rental property creates a different legal dynamic than in an owner-occupied home. If you’re renting and your landlord recently renovated, their contractor’s work may have introduced the moisture problem — and in many jurisdictions, landlords bear legal responsibility for habitable conditions, including mold remediation.
In owner-occupied homes, the question is whether the contractor caused the mold through faulty workmanship. Improperly installed shower pans, skipped waterproofing membranes, or ventilation that exhausts into the attic instead of outside — these are construction defects, and most contractor agreements and state licensing laws create liability for defective work. Document everything with photos and timestamps before you start any remediation, because once you start repairs, the evidence disappears.
Homeowner’s insurance is worth a call, but temper your expectations. Most standard policies cover sudden and accidental water damage — a burst pipe discovered immediately, for example. Slow leaks or condensation problems that develop over weeks after a renovation typically fall under the “gradual damage” exclusion, which most policies don’t cover. Some specialty policies and renovation warranties do include mold coverage; check your specific documents before assuming either way.
How Do You Prevent Mold During and After a Renovation?
Prevention is infinitely cheaper than remediation — remediation for a single bathroom typically runs $1,500 to $5,000; for a basement, costs can reach $10,000 or more. The measures that actually prevent post-renovation mold mostly happen during the project, not after it’s done.
Before any materials go up, make sure the structure is dry. New framing should have a moisture content below 19% before drywall is installed — any higher and you’ve essentially guaranteed an elevated risk environment. Ask your contractor to show you moisture meter readings on lumber before wallboard goes up. This is a completely reasonable request that any experienced contractor will understand, and if they push back, that’s useful information about how they work.
Use mold-resistant materials wherever moisture is plausible. Paperless drywall (like DensArmor or equivalent) in bathrooms, laundry rooms, and basements eliminates one of the primary mold food sources. Mold-resistant primers and paints aren’t a substitute for proper moisture management, but they add a meaningful second line of defense on surfaces that will periodically see elevated humidity.
Keep the renovation space ventilated throughout the project. Concrete curing releases substantial moisture — a standard 4-inch concrete slab gives off roughly 2 pounds of water vapor per square foot as it cures. In a sealed space, that moisture goes directly into surrounding materials. Running a dehumidifier during and immediately after construction in enclosed spaces is one of the most cost-effective mold prevention steps available, and almost no one does it.
After the project wraps, monitor relative humidity weekly for at least 60 days. A digital hygrometer placed in the renovated space tells you immediately if humidity is creeping up — catching an elevated reading early means you can investigate the cause before mold has had time to establish. Target 30–50% relative humidity indoors; anything consistently above 55% deserves attention.
Does Post-Renovation Mold Always Need Professional Remediation?
Small, contained mold growth — a 2-by-2-foot patch on a single sheet of drywall, for example — is generally within DIY territory if you take proper precautions. Wear an N95 respirator (not a dust mask), gloves, and eye protection. Seal off the work area from the rest of the house with plastic sheeting, and use negative pressure if possible by running a box fan exhausting air outside through a window.
The situation calls for professional remediation when any of these apply: the affected area exceeds 10 square feet, the mold involves HVAC systems or ductwork, there are occupants with respiratory conditions or compromised immune systems in the home, or you’ve already attempted DIY removal and it came back. Recurring mold is a clear signal that the moisture source wasn’t resolved — professionals bring moisture investigation tools and containment protocols that make the process more definitive.
One thing worth knowing: professional mold remediators are not mold testers. Hiring the same company to test for mold and remediate it creates an obvious conflict of interest — they have financial incentive to find a problem. Hire a separate certified industrial hygienist for testing and a separate contractor for remediation. It costs more upfront and almost always saves money in the long run.
How Long After a Renovation Can Mold Start Growing?
Mold can begin colonizing a surface within 24–48 hours of sustained exposure to humidity above 60% — that’s not a “worst case” estimate, that’s just mold biology. In a newly renovated space with materials that haven’t fully dried, the window for early growth is essentially the entire first few weeks after the project wraps.
Visible mold, though, often takes longer to appear. Colonies growing on the back face of drywall or inside wall cavities can reach significant size before any surface discoloration shows up. Practically speaking, most people notice post-renovation mold between 2 and 12 weeks after completion — but mold in basement renovations or behind tile walls sometimes stays hidden for 6 months or more until the smell becomes undeniable or water staining appears at baseboards.
Seasonal timing matters too. A summer renovation might not show mold problems until the following winter when heating systems dry out indoor air and create temperature differentials that cause condensation on exterior walls. The renovation and the mold appearance feel disconnected in time — but the causation is real. That’s exactly why the 60-day post-renovation monitoring period is worth treating as standard practice, not optional.
Understanding that post-renovation mold is largely a moisture management problem — not a cleaning problem — changes how you approach both prevention and remediation. The renovation industry is slowly shifting toward building science-informed practices that treat moisture control as a fundamental phase of any project, not an afterthought. The homes that handle this well aren’t the ones with the most expensive materials; they’re the ones where contractors measured moisture content before closing walls and where homeowners tracked humidity after move-in. That’s a habit that costs almost nothing and prevents an enormous amount of grief.
Frequently Asked Questions
Is mold after renovation common?
Yes. Renovation often introduces moisture and changes airflow.
Can mold appear without leaks after renovation?
Yes. Trapped moisture and condensation are common causes.
Why does mold show up months later?
Because moisture dries slowly behind finished surfaces.
Does new paint prevent mold?
Not always. Paint can trap moisture inside walls.
Is mold after renovation a sign of poor work?
Not necessarily. It often reflects moisture and ventilation conditions.
Disclaimer: This article is for informational purposes only and isn’t a substitute for professional mold inspection or remediation advice. Mold problems vary a lot depending on the material affected, the extent of growth, and your specific health situation. Always follow product label instructions when using cleaning chemicals, ensure proper ventilation, and consider consulting a certified mold remediation professional for anything beyond a small, surface-level patch. If you have respiratory conditions, allergies, or a compromised immune system, talk to a doctor before starting any DIY mold removal.