
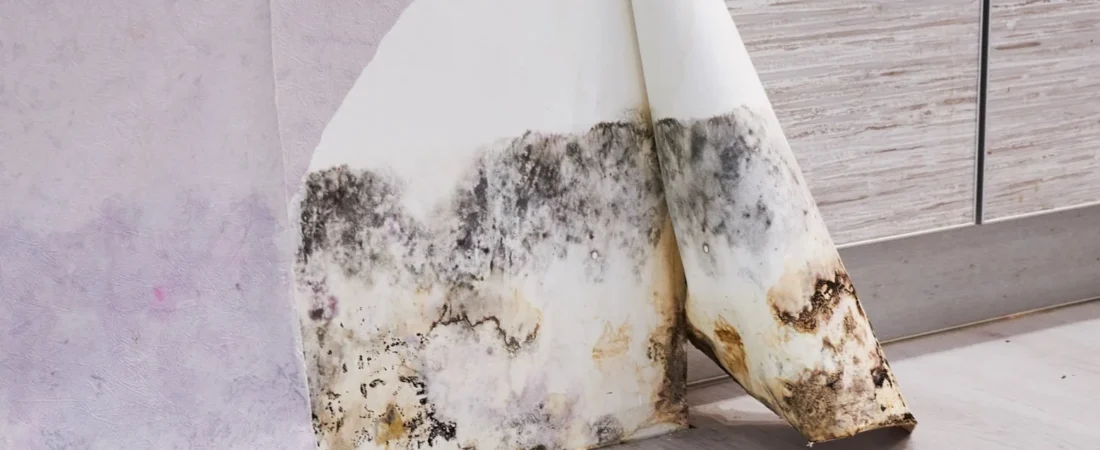
Bottom line up front: Wallpaper doesn’t cause mold — but it creates the perfect hiding place for it. The real problem isn’t the mold you eventually see peeling at the seams; it’s the mold that’s been silently colonizing the drywall or plaster behind the paper for weeks before you notice anything at all. By the time visible signs appear, you’re usually dealing with a growth that’s been there far longer than you’d want to admit.
Here’s what most guides get wrong: they treat mold under wallpaper as a ventilation problem or a cleaning problem. It’s neither. It’s a trapped moisture problem with a specific physics to it that wallpaper uniquely creates. Understanding that distinction changes everything about how you prevent it, detect it, and deal with it.
Why Wallpaper Creates a Mold Risk That Painted Walls Don’t
Paint is porous enough to let walls breathe — moisture vapor can pass through and evaporate. Wallpaper, especially vinyl-backed or foil types, seals the wall surface like a second skin. That seal traps any moisture that gets into the wall assembly, whether from condensation, a slow plumbing leak, or humidity migrating inward from a bathroom or kitchen.
The adhesive paste used to hang wallpaper adds another layer to this problem. Paste is organic, water-soluble, and starchy — essentially a food source for mold spores, which are present in virtually every indoor environment. When moisture gets trapped between the paper and the wall, you’ve created a dark, humid, nutrient-rich microenvironment that mold genuinely thrives in.
Temperature differentials make this worse. In winter, the wall cavity behind exterior-facing wallpaper can be significantly cooler than the room air. Warm interior air carries moisture; when it contacts the cooler wall surface behind non-breathable wallpaper, it condenses. That condensation has nowhere to go. Mold doesn’t need a lot of water — just a surface that stays above 70% relative humidity for 24 to 48 hours is enough to start colony formation.
What Are the Early Warning Signs of Mold Under Wallpaper?
The frustrating thing about mold under wallpaper is that the most reliable early sign isn’t visual — it’s olfactory. A persistent musty smell in a room, especially one that’s worse in winter or after humid weather, is your first real clue. That smell is microbial volatile organic compounds (MVOCs) off-gassing through or around the paper edges.
Visual signs come later, and they’re often misread. Bubbling or lifting seams get blamed on old paste, poor installation, or humidity swings — which are all partly true. But seams lifting in a specific area, particularly near the floor or behind furniture, often signals localized moisture accumulation underneath. Wallpaper pulls away from the wall when the adhesive bond is weakened by moisture, and mold accelerates that process by breaking down the paste itself.
Discoloration is the clearest sign, but it’s deceptive in form. You might see yellowish or brownish staining rather than the classic dark spots people associate with mold. The paper layer diffuses and partially filters the color of what’s growing behind it. Dark speckling at seams, corners, or along the base of the wall is more definitive and shouldn’t be ignored.
Mold under wallpaper tends to concentrate in predictable locations — behind furniture placed against exterior walls, near windows, and in rooms with high humidity like bathrooms and kitchens. Corners and areas near windows are especially vulnerable because that’s where cold wall surfaces meet warm room air most dramatically, driving condensation into the wall.
How Do You Actually Confirm Mold Is Growing Behind Wallpaper?
You can’t confirm it without looking — but you can narrow your suspicion before you start peeling. A moisture meter is your best first tool. Probe the wall surface through the paper in suspected areas; readings above 17% moisture content in drywall suggest conditions favorable to mold growth. Sustained readings above 20% are a near-certainty that something problematic is happening.
Peel back a small section at a seam in the most suspect area. You’re looking for dark staining on the back of the paper itself, on the paste layer, or on the wall surface. Black, green, or gray growth is obvious. But sometimes you’ll see a white powdery residue that can be mold or efflorescence — smell it. Mold has that earthy, musty odor; efflorescence (mineral salt deposits from moisture migration) is essentially odorless.
For a more rigorous check, press a piece of clear tape against the wall surface after peeling back the paper, then examine it under a strong light or magnifying glass. Home mold test kits that use a petri dish with growth medium can also confirm presence, though they won’t tell you the species or concentration — just whether viable spores are there.
“The real diagnostic mistake homeowners make is treating a moisture reading or a visual check as a final answer. Mold behind wallpaper is often patchy — you can find a clean area six inches from a heavily colonized one. When in doubt, peel more and test more. A single sample from the wrong spot will give you false confidence.”
Dr. Sandra Okafor, Certified Industrial Hygienist and Indoor Air Quality Consultant
Which Types of Wallpaper Are Highest Risk for Mold Growth?
Not all wallpaper carries equal risk, and this is one of the most practically useful things to know before you choose materials for a renovation. Vinyl wallpapers — the most common residential type — are the highest risk because they’re essentially vapor-impermeable. Any moisture that gets behind them stays there.
| Wallpaper Type | Vapor Permeability | Mold Risk Level |
|---|---|---|
| Solid Vinyl / Vinyl-Coated | Very Low | High |
| Foil / Metallic | Near Zero | Very High |
| Fabric / Textile-Backed | Moderate | Medium |
| Natural Fiber (Grasscloth, Jute) | High | Lower (but absorbs moisture) |
The counterintuitive entry on that list is natural fiber wallpaper like grasscloth or jute. These are breathable, which sounds better — and it is, in terms of not trapping condensation against the wall. But natural fibers absorb moisture directly, which means in a humid environment, the wallpaper itself becomes the mold substrate rather than the wall behind it. You’ll get surface mold on the paper face instead of hidden mold behind it. It’s more visible but no less of a problem.
Fabric-backed papers fall in the middle. They allow some vapor movement but still restrict it enough to create risk on poorly insulated or moisture-prone walls. The honest answer is that no wallpaper type is entirely mold-proof — the installation environment and wall conditions matter as much as the material.
How to Remove Mold-Contaminated Wallpaper Safely
Before you start peeling, stop and think about containment. If the affected area is larger than roughly 10 square feet, the EPA’s guidance recommends professional remediation — not because you’re incapable of removing it, but because disturbing a large mold colony releases enormous quantities of spores into the air, and those spores will settle throughout your home if you’re not set up to contain them properly.
For smaller areas, work with the room sealed off, an N95 respirator on, gloves, and eye protection. Open a window to the exterior if possible with a fan blowing outward to create negative pressure relative to the rest of the home. This isn’t overkill — it’s the difference between cleaning up one room and inadvertently seeding mold throughout your HVAC system.
Here’s the removal process in order:
- Score and dampen the wallpaper — Use a scoring tool lightly (don’t gouge the drywall) and apply a wallpaper removal solution or fabric softener diluted in warm water. Let it soak for 5 to 10 minutes per section.
- Peel in sections — Pull slowly at a low angle to the wall. Rushing causes drywall paper to tear, which creates a rougher surface that’s even harder to clean and treat.
- Treat the wall surface — Apply a mold-killing solution (undiluted white vinegar, a commercial antimicrobial, or a 1:10 bleach-to-water solution for non-porous surfaces) and allow it to dwell for at least 10 minutes before wiping.
- Let the wall dry completely — Use fans and a dehumidifier. Wall surfaces should reach below 12% moisture content before you do anything else. This can take 24 to 72 hours depending on the extent of saturation.
- Assess the substrate — If drywall paper has been stained through or the gypsum feels soft or crumbly, that section needs to be cut out and replaced. No amount of treatment will make compromised drywall safe to cover again.
- Prime before any new covering — Use a mold-resistant primer (shellac-based primers are excellent for this) before hanging new wallpaper or painting. Skipping this step after a mold event is a guaranteed way to have the problem return.
Pro-Tip: Don’t use a steam wallpaper stripper if you suspect mold behind the paper. Steam adds moisture to an already moisture-saturated environment and can push mold spores deeper into porous wall materials. Stick to chemical removal solutions and dry-air methods.
Can You Put New Wallpaper Over a Wall That Had Mold?
Technically yes. Practically, you should think hard before you do. The question isn’t whether you cleaned the mold — it’s whether you’ve fixed whatever allowed moisture to accumulate there in the first place. Hanging new wallpaper over a wall that still has the same moisture conditions is just setting up the same problem on a faster timeline.
Before re-wallpapering, identify and resolve the moisture source. Is the wall an exterior wall with inadequate insulation? Is there a bathroom on the other side sharing that surface? Is there a slow pipe leak that was never properly repaired? Answering these questions is more valuable than any product or technique you apply to the surface itself.
If you do re-wallpaper an area that had mold, choose a breathable paper type when possible, apply mold-resistant adhesive, and consider applying a skim coat of joint compound or using mold-resistant drywall as a replacement substrate. These aren’t guarantees — but they shift the odds meaningfully in your favor.
How to Prevent Mold Under Wallpaper Long-Term
Prevention works at two levels: controlling moisture in the room and controlling moisture at the wall surface. Most people focus entirely on the room — running a dehumidifier, using exhaust fans — without thinking about what’s happening at the wall itself. That’s an incomplete strategy.
Here’s what actually moves the needle on prevention:
- Keep indoor relative humidity between 30% and 50%. Above 60%, you’re actively feeding mold. A hygrometer costs under $15 and takes 30 seconds to read — there’s no excuse for not knowing your numbers.
- Insulate exterior walls properly before wallpapering. Cold wall surfaces are where condensation forms. Better insulation keeps the wall surface temperature closer to room temperature, reducing the condensation risk dramatically.
- Don’t place furniture flush against exterior walls. A 2-inch air gap between the back of a bookcase or sofa and the wall allows air to circulate rather than stagnating and creating a humidity pocket.
- Use mold-resistant adhesive when hanging wallpaper. Standard wheat-based pastes are particularly susceptible to mold growth. Modern synthetic adhesives with biocide additives resist this significantly better.
- Inspect seams annually, particularly in autumn. As outdoor temperatures drop, condensation risk rises. Early detection of seam lifting or localized bubbling catches problems when they’re still manageable.
Something worth knowing that most people overlook: wallpaper installed on new drywall is especially at risk in the first year. New drywall releases moisture as it cures, and that outgassing has to go somewhere. If it’s trapped by non-breathable wallpaper, it concentrates at the adhesive layer — exactly where mold wants to establish. Allowing new drywall to cure for at least 30 to 60 days before wallpapering significantly reduces this risk.
Is Mold Under Wallpaper a Health Risk — and How Serious Is It?
The health risk depends heavily on the species involved and your personal sensitivity — and that’s an honest nuance that deserves acknowledgment rather than a blanket statement. Common household molds like Cladosporium or Penicillium cause respiratory irritation, allergic reactions, and worsening asthma symptoms in sensitive individuals. They’re unpleasant but manageable with proper remediation.
Stachybotrys chartarum — the notorious “black mold” — requires sustained heavy moisture over a long period to establish. It’s rarer than the name recognition would suggest, but it does occur in severely water-damaged environments. The toxins it produces (trichothecene mycotoxins) are a legitimate concern, particularly for people with compromised immune systems, children, and the elderly.
Here’s the part that gets underemphasized in most guides: mold behind wallpaper can release spores continuously into a room even without visible surface growth, because those spores migrate through imperfect seams and gaps at the edges of the paper. A person sleeping in a room with hidden wall mold is being exposed to elevated spore counts night after night, even with no obvious sign anything is wrong. That chronic low-level exposure matters more than most people realize.
What Does Mold Remediation Actually Cost for Wallpapered Walls?
Cost scales fast with the size of the affected area and whether drywall replacement is involved. A real-world scenario: a homeowner notices lifted seams and discoloration on a single interior wall of a master bedroom. They peel back the wallpaper to find mold covering approximately 15 square feet of drywall. At that scope, professional remediation — including containment, removal, antimicrobial treatment, drywall replacement, and priming — typically runs between $500 and $1,500 depending on location.
If mold has spread to multiple walls or the moisture source was a slow plumbing leak that went undetected for months, costs can climb to $3,000 to $7,000 or more, especially when structural framing is affected. Insurance coverage varies widely — water damage from a sudden, accidental event is often covered, but slow leak damage is frequently excluded as a maintenance issue.
DIY remediation for areas under 10 square feet is genuinely viable and can cost as little as $50 to $150 in supplies — removal solution, protective gear, antimicrobial spray, mold-resistant primer, and replacement materials. The caveat is doing it correctly, which means not skipping the dry-out period and not re-covering a wall that still has active moisture intrusion.
When Should You Call a Professional Instead of Handling It Yourself?
The 10-square-foot threshold is a reasonable starting point for the DIY-versus-pro decision, but it’s not the only factor. Call a professional if you can’t identify the moisture source, if the wall feels soft or the mold has penetrated beyond the surface layer into the drywall core, or if anyone in the household has asthma, allergies, or an immune condition. The risk-benefit calculation changes significantly with vulnerable occupants present.
You should also bring in a professional if the mold is in an HVAC-adjacent wall, near ductwork, or in a mechanical room. Disturbing mold in those locations without proper containment can distribute spores throughout the entire building envelope within hours.
A certified mold inspector (look for IICRC or NORMI certifications) can assess the extent of contamination, identify the moisture source, and give you a remediation plan before any work begins. An inspection typically costs $200 to $600 — money well spent before committing to either expensive professional remediation or a DIY effort that might not address the full scope.
The Bigger Picture: What Mold Under Wallpaper Tells You About Your Home
Finding mold behind wallpaper is uncomfortable, but it’s actually useful information. It’s telling you something specific about your building envelope — where moisture is entering, where it’s getting trapped, and where your insulation or vapor barrier is underperforming. That’s not a pleasant discovery, but it’s a precise one.
Homes that develop mold under wallpaper in one location often have the same moisture dynamics playing out in other less-visible areas — inside wall cavities, under flooring, or in the attic assembly. Treating the visible problem without investigating the broader moisture picture is like pulling out a dandelion at the stem.
As building science continues to improve our understanding of vapor drive and wall assembly performance, homes are increasingly being designed with deliberate vapor management built in — not just insulation and vapor barriers, but whole-wall systems that handle moisture movement intelligently. The homes that age best aren’t the ones that repel all moisture, but the ones designed to allow controlled drying. That principle applies to every decision you make about what goes on your walls.
Frequently Asked Questions
Why does mold grow under wallpaper?
Because moisture becomes trapped and cannot evaporate.
Can mold form without visible water damage?
Yes, condensation and humidity are enough.
Is mold under wallpaper always visible?
No, it often remains hidden for long periods.
Does wallpaper cause mold?
Wallpaper does not cause mold, but it can trap moisture.
Disclaimer: This article is for informational purposes only and isn’t a substitute for professional mold inspection or remediation advice. Mold problems vary a lot depending on the material affected, the extent of growth, and your specific health situation. Always follow product label instructions when using cleaning chemicals, ensure proper ventilation, and consider consulting a certified mold remediation professional for anything beyond a small, surface-level patch. If you have respiratory conditions, allergies, or a compromised immune system, talk to a doctor before starting any DIY mold removal.