
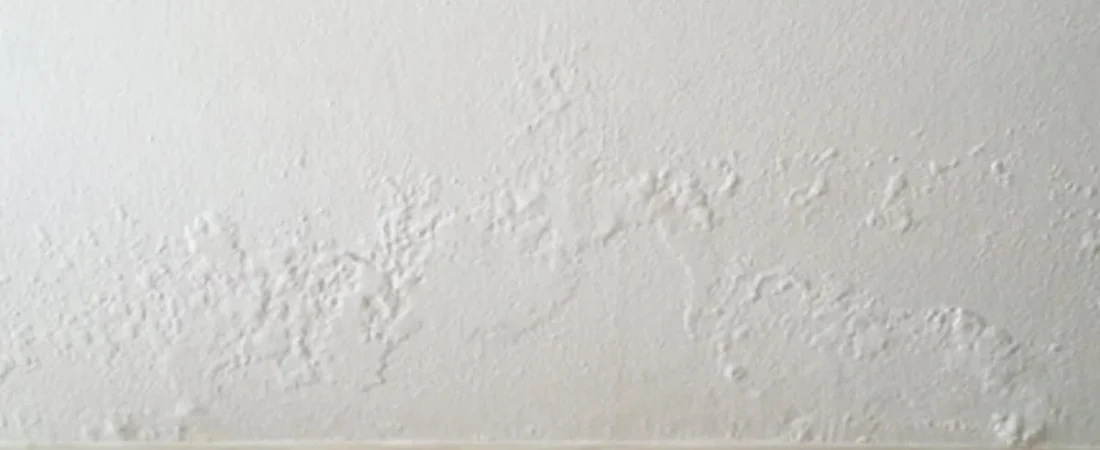
Damp walls fail silently — and by the time paint peels or plaster crumbles, moisture has usually been sitting inside that wall for months. Knowing how to tell if a wall is damp before the visible damage appears is the skill most homeowners never develop, and it’s exactly where most guides fall short. They tell you to look for stains. That’s the last clue, not the first.
Why Most People Misread Damp Walls Until It’s Too Late
The core problem is that people treat damp detection like a visual exercise — you spot something wrong, then you act. But moisture in walls operates mostly in the invisible range, where it’s been building up long before any surface sign appears. A wall can hold 20–30% more moisture than it should before the paint even begins to bubble.
That’s the counterintuitive part: a wall can look completely fine and still be dangerously damp inside. Internal condensation, slow rising damp, and interstitial moisture — moisture trapped between layers of construction material — all do their damage quietly. By the time your eyes catch it, your nose, your hands, or a basic meter would have caught it weeks earlier.
So the real skill isn’t identifying visible damp. It’s learning to read the early signals — the ones that happen before any stain, crack, or bloom appears on the surface.
What Does a Damp Wall Actually Feel Like?
Run your flat palm slowly across the wall surface — not just a quick touch, a slow drag. A damp wall will feel noticeably cooler than surrounding walls, sometimes slightly tacky, and in more advanced cases, faintly gritty from salt deposits migrating out of the masonry. These are three distinct textures that tell you three different things about what’s happening inside.
Cool to the touch usually means the wall surface is below the dew point of the room air, which causes surface condensation to form — even if you can’t see a visible film of water. Tacky means active moisture is sitting close to the surface and hasn’t dried. Gritty means efflorescence: soluble salts carried by water have reached the surface and crystallised, which is a sign of ongoing moisture movement through the wall rather than a one-time event.
One honest caveat here: not every cool wall is a damp wall. External walls in winter will naturally feel cooler than internal partition walls. The question is whether the coolness is uneven — concentrated in patches, especially near the base of the wall or around window reveals — which points to moisture rather than temperature alone.
How to Tell If a Wall Is Damp Using a Moisture Meter
A basic pin-type moisture meter costs between £15 and £40 and gives you a reading in seconds. Press the two metal pins directly into the wall surface — plaster, drywall, or bare masonry — and the device measures electrical resistance, which correlates to moisture content. The higher the moisture, the lower the resistance, and the higher your reading.
For plaster and drywall, a reading below 15% is generally considered dry. Anything between 15% and 20% is borderline and worth monitoring. Above 20%, you’re looking at active dampness that needs attention. For masonry like brick or concrete, those thresholds shift upward slightly because dense materials naturally hold more baseline moisture — so always check the manufacturer’s calibration guide for your specific meter model.
Pin meters are the most affordable option, but they only read the top few millimetres of the surface. If you want to check deeper into the wall without drilling, a non-invasive capacitance meter uses radio frequency to scan up to 40mm deep — far more useful for identifying moisture behind tiles or beneath thick plaster. For serious investigation, combining both types gives you surface-level and sub-surface data at the same time.
Pro-Tip: Before testing with a moisture meter, let the wall surface sit undisturbed for at least an hour after any recent activity like cooking, showering, or cleaning. Surface condensation from everyday humidity can cause falsely elevated readings and lead you to diagnose dampness where there’s actually just poor ventilation.
What Are the Early Visual Signs of a Damp Wall?
The visual signs most guides lead with — dark staining, peeling paint, visible mould — are actually late-stage indicators. By the time you see those, moisture has been present long enough to damage the wall’s structure or finish. What you want to catch are the precursor signs that show up weeks or months earlier.
Tide marks are one of the earliest reliable visual clues. These are faint horizontal lines, sometimes slightly darker than the surrounding plaster, that mark the highest point moisture has reached inside the wall. They’re most common in rising damp scenarios and often appear at a consistent height of around 1 metre from the floor — not coincidentally, the same height that capillary action in masonry typically reaches. A single tide mark that hasn’t spread may indicate a past moisture event that’s since dried out. Multiple tide marks at different heights, or a mark that’s visibly creeping upward, means the problem is ongoing.
Micro-cracking in paint is another early signal that almost nobody talks about. As moisture moves in and out of plaster, it causes slight expansion and contraction. Over time, the paint layer develops a fine network of hairline cracks — not the large cracking you’d associate with structural movement, but a pattern that looks almost like dried mud at close range. This pattern, called crazing, is worth investigating with a moisture meter even when the wall still looks broadly acceptable from a distance.
How Does Smell Help Identify Damp in Walls?
Your nose is a remarkably sensitive instrument for moisture detection — in some cases, more reliable than your eyes. A damp wall produces a distinctive earthy, musty smell caused by microbial volatile organic compounds (MVOCs) released by mould and mildew colonies growing on or inside the wall. These compounds are detectable by smell long before the mould becomes visible on the surface.
The key is to smell close to the wall rather than the centre of the room. Press your nose near the skirting board, around electrical outlets, and in the corners where walls meet — corners are the coldest points in a room and the first places condensation accumulates. A smell that intensifies noticeably as you get closer to the wall is a reliable indicator that something is growing inside it.
There’s a real-world scenario worth knowing: many people first notice damp smell in their wardrobe before they notice it anywhere else in the room. Wardrobes placed against external walls trap cold air, restrict airflow, and create exactly the humid, stagnant microclimate that mould thrives in. If your wardrobe has that persistent musty smell, check the wall behind it — not the wardrobe itself — with a moisture meter.
What’s the Difference Between Rising Damp, Condensation, and Penetrating Damp?
These three types of wall dampness have different causes, different locations, and importantly, different fixes. Misidentifying which type you have is one of the most expensive mistakes a homeowner can make — because the remediation for each is completely different.
| Type | Location on Wall | Key Visual Clue | Likely Cause |
|---|---|---|---|
| Rising Damp | Bottom 1–1.5m from floor | Tide marks, salt bloom at base | Failed or absent damp-proof course |
| Penetrating Damp | Anywhere, often patches | Isolated wet patches, worse after rain | Structural defect, cracked render, leaking roof |
| Condensation Damp | Cold surfaces, corners, reveals | Surface mould, streaming windows nearby | High indoor humidity, poor ventilation |
Rising damp is often misdiagnosed — and overtreated. Several independent studies have found that true rising damp (caused by a failed damp-proof course) is far less common than the damp-proofing industry would have you believe, with condensation damp being responsible for the majority of cases labelled as rising damp. That’s not to say rising damp doesn’t exist — it absolutely does — but before spending thousands on a chemical injection DPC, it’s worth ruling out condensation and penetrating damp first.
Penetrating damp almost always gets worse after heavy rainfall, which is your diagnostic test: check the wall 24–48 hours after a significant rain event and see if readings or visible signs increase. Condensation damp, by contrast, will be worst in winter and worst in the mornings after a cold night — because that’s when indoor-outdoor temperature differentials are highest and the wall surface temperature is most likely to fall below the dew point.
How to Check a Wall for Damp Without Any Equipment
You don’t always have a moisture meter to hand, and that’s fine. There are several reliable low-tech methods that give you a reasonable indication of whether a wall is holding moisture — and they’re worth knowing even if you own a meter, because they provide different types of information.
- The plastic sheet test: Tape a 30cm × 30cm piece of clear polythene tightly to the wall surface, sealing all four edges with duct tape. Leave it in place for 24–48 hours. If moisture appears on the inside of the plastic (between the plastic and the wall), the dampness is coming from within the wall. If moisture appears on the outside of the plastic (between the plastic and the room air), condensation is the issue, not internal moisture.
- The newspaper test: Press a sheet of newspaper flat against the wall and hold it there for 60 seconds. A damp wall will leave the paper noticeably cooler and slightly limp. This works best on painted plaster and is a reasonable first-pass test in the absence of anything more precise.
- Check the skirting boards: Timber skirtings in contact with a damp wall absorb moisture over time. Run your finger along the top edge of the skirting where it meets the plaster — if it feels soft, spongy, or comes away from the wall with slight pressure, that’s a reliable sign of sustained moisture at the base of the wall.
- Look for efflorescence: White, powdery or crystalline deposits on the wall surface are salt deposits left behind as moisture evaporates. They indicate moisture is actively moving through the wall, even if the surface currently feels dry. Brush them off and if they return within a few weeks, the moisture source hasn’t been resolved.
- Check behind furniture: Furniture pushed against cold external walls inhibits airflow and creates condensation traps. Pull the furniture away and check the wall surface and the back of the furniture itself — black mould spotting on either surface is a strong indicator of a condensation problem in that wall.
Why Do Some Walls Feel Damp Even When There’s No Leak?
This is the question that trips people up most consistently. A wall can feel persistently cold and clammy without any plumbing leak, roof issue, or failed damp-proof course — and the answer is usually thermal bridging combined with indoor humidity levels that are just slightly too high.
Thermal bridging happens where construction materials with high thermal conductivity — steel lintels, concrete columns, window frames — interrupt the insulation layer and create cold spots. These cold spots pull the local wall surface temperature below the dew point, causing moisture from indoor air to condense directly onto or into the wall surface. It’s not a leak. It’s physics. And the fix involves improving insulation or reducing indoor humidity, not waterproofing the wall.
Understanding why walls feel damp even in the absence of obvious water ingress is actually the key to diagnosing the majority of damp complaints in modern well-sealed homes, where condensation damp has overtaken penetrating damp as the dominant problem. If your home is well-insulated, double-glazed, and draft-proofed, but your walls still feel damp in winter — it’s almost certainly a condensation and ventilation issue, not a structural one.
What Moisture Level in a Wall Should Concern You?
Specific numbers matter here, because vague terms like “high” or “elevated” moisture don’t help you make decisions. The thresholds below are commonly used by surveyors and damp specialists as a working guide — though always remember that different meter types and different materials require calibration adjustments.
- Below 15% (plaster/drywall): Considered dry. No action required unless you have other symptoms like smell or efflorescence.
- 15–20% (plaster/drywall): Borderline. Monitor over 2–4 weeks. If the reading stays static, the moisture may be residual from a past event. If it rises, investigate further.
- Above 20% (plaster/drywall): Active dampness. You need to identify the source before any decorating or repair — covering damp with fresh plaster or paint is a short-term fix that almost always fails.
- Above 75% relative humidity at the wall surface: Mould growth becomes likely within 24–48 hours at this surface humidity level. If you have a surface hygrometer and it’s reading consistently above 75% against the wall, ventilation is an immediate priority.
“One of the most common mistakes I see is homeowners treating the symptom — the stain, the peeling paint — without ever measuring what’s actually happening inside the wall. A moisture meter reading taken across multiple points on the same wall tells you far more than any visual inspection. And in about 40% of cases where rising damp has been diagnosed, what I actually find when I measure properly is severe condensation. The wall type, the meter readings, and the pattern of dampness together — that’s your diagnosis.”
James Whitfield, CSRT-qualified damp and timber surveyor with 18 years of residential survey experience
Can Damp Walls Be Confused With Something Else?
Yes — and this matters more than most guides acknowledge. Two conditions regularly get misidentified as damp when they’re actually something different, and correctly distinguishing them saves both money and effort.
The first is hygroscopic salts. Old masonry walls — particularly those built before the mid-20th century — often contain high levels of hygroscopic salts absorbed from historic damp events or ground contamination. These salts attract moisture from the air and keep the wall feeling damp even after the original source of moisture has been fixed. You’ll get consistently elevated moisture meter readings, but the wall may be structurally fine and no longer actively taking in water. A chemical analysis of plaster samples is the only reliable way to confirm hygroscopic salt contamination.
The second is leaking plumbing inside the wall cavity. A slow drip from a pipe chase or behind a shower tray creates a wet patch that looks exactly like penetrating damp and behaves like it too. The diagnostic test is to switch off your water supply at the mains and take moisture meter readings over 48 hours — if the readings plateau or fall slightly, you likely have a plumbing leak rather than weather-related penetrating damp. If readings continue to fluctuate with rainfall, the source is external.
When Should You Call a Professional to Assess a Damp Wall?
There’s a version of this that you can handle yourself, and a version you can’t. If your moisture meter shows readings consistently above 25%, you’re seeing active mould growth across more than 1 square metre of wall, or you suspect structural damage to masonry or timber frame elements, that’s past the point of DIY diagnosis.
Look specifically for a surveyor who holds CSRT (Certificate in Remedial Treatment) or CSSW (Certificate in Structural Waterproofing) qualification — these are the relevant credentials for damp assessment in the UK. A qualified independent surveyor, one who isn’t selling you a remediation product at the same time, will cost between £200 and £400 for a full damp survey. That feels expensive until you compare it to the cost of having unnecessary chemical injection work done because a salesperson misdiagnosed condensation as rising damp.
Honest caveat: for mild, localised damp — a small patch near a window that appears in winter and retreats in summer, for example — professional assessment may be overkill. A moisture meter, the plastic sheet test, and improved ventilation will give you enough information to manage it yourself. Save the professional visit for persistent, spreading, or structurally threatening moisture.
How to Monitor a Wall Over Time to Track Dampness
Single-point readings are less useful than most people realise. A moisture meter reading taken once on a dry afternoon in summer tells you almost nothing about whether your wall has a chronic damp problem. What tells you something is a series of readings, taken consistently, across different conditions.
Mark 6–8 specific test points on your wall with a pencil — at the base, mid-height, and near any suspected problem areas — and take readings weekly for a month, ideally including one reading after a sustained rain period and one during a particularly cold spell. Log them in a notes app or a simple spreadsheet. A pattern of rising readings after rain means penetrating damp. A pattern of higher readings in cold weather means condensation. Readings that stay consistently elevated regardless of weather mean either hygroscopic salts or a continuous internal source like a leaking pipe.
This monitoring approach costs nothing beyond the meter itself and gives you genuinely useful diagnostic data — the kind that a surveyor will actually want to see if you do eventually call one in. Arriving with a month of logged moisture readings is far more useful than arriving with a description of what you think you saw.
The future of damp detection in homes is moving toward continuous embedded sensors — small devices placed inside wall cavities that transmit real-time moisture data to your phone. As these become cheaper and more common in new builds and retrofits, the era of reactive damp diagnosis — noticing a problem only after visible damage appears — will gradually give way to predictive management, where moisture issues are identified and resolved before they reach the surface at all.
Frequently Asked Questions
How can I tell if a wall is damp without tools?
By observing touch, smell, drying time, location, and seasonal patterns.
Can a wall be damp without visible water?
Yes. Dampness often involves retained moisture rather than visible wetness.
Are exterior walls more likely to be damp?
Yes, because they stay colder and dry more slowly.
Does condensation mean a wall is damp?
Not always. Dampness develops when moisture persists over time.