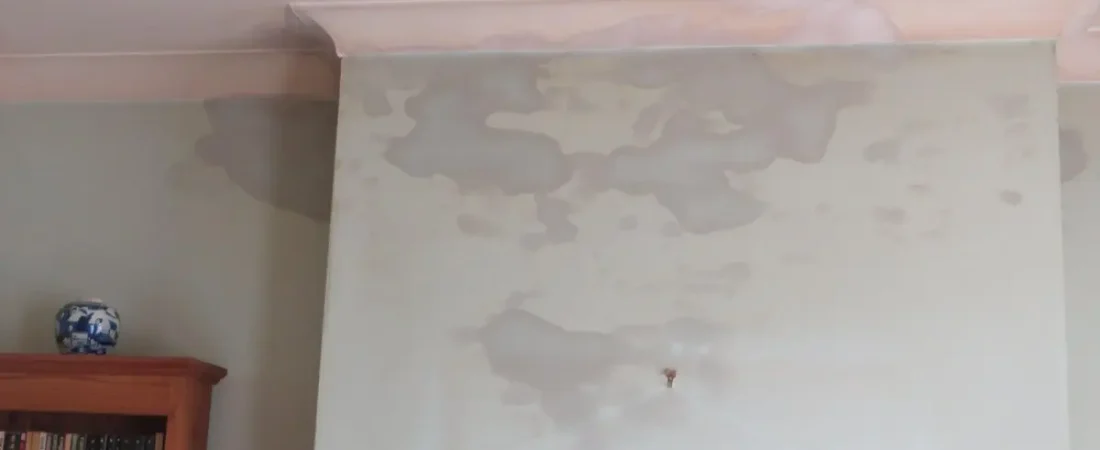
Nobody suspects humidity until a contractor tears open a wall and finds black mold growing on bone-dry drywall — no pipe, no crack, no flood. That’s the dirty secret about damp walls without leaks: the water isn’t coming through your wall. It’s being manufactured inside your home, every single day, by the air you breathe.
What Actually Causes Damp Walls When There’s No Leak?
The mechanism is condensation, and it works like this: warm indoor air holds moisture invisibly as water vapor. The moment that air contacts a surface cold enough — called the dew point — the vapor converts back into liquid water. Your wall doesn’t need a crack to get wet. It just needs to be cold enough, long enough, for air to deposit moisture directly onto or inside it.
This is exactly why you see the same problem appear in patches rather than spreading from a single point. Condensation follows cold spots: poorly insulated sections, metal wall ties embedded in masonry, corners where two exterior walls meet, and areas behind furniture blocking airflow. The pattern looks random because cold surfaces are scattered, not because multiple leaks are occurring.
There’s also a subtler version: interstitial condensation. This happens inside the wall structure itself, not on the visible surface. Warm humid air diffuses through permeable materials until it hits a cold layer — often insulation batts or the back face of external cladding — and condenses there, completely out of sight. You’d never feel it with your hand. But over months, that hidden moisture saturates timber, corrodes fixings, and feeds mold colonies you won’t discover until renovation day.
Why Do Most People (and Many Contractors) Diagnose This Wrong?
The standard assumption is that water on a wall means water has entered from outside. That logic makes sense for a roof or a window frame, but it’s dangerously wrong when applied to interior surfaces experiencing condensation. Here’s the problem: the symptoms look almost identical. Discoloration, a cold damp feel, damp smells , and eventually mold — these show up whether you have a leaking pipe or a relative humidity problem, and most diagnostic tools don’t tell them apart at first glance.
Moisture meters are the most misused tool in this situation. They measure electrical resistance in a material, which rises with water content — but they can’t tell you whether that water came from outside or condensed from inside. A contractor who reads a high moisture level in your plaster and immediately starts talking about waterproofing membranes may be solving the wrong problem entirely. That’s thousands of dollars treating a symptom while the actual cause — your indoor relative humidity — keeps generating new moisture every night.
The counterintuitive fact that most guides miss: a well-sealed, energy-efficient home is actually more prone to condensation-driven damp walls than a drafty old house. Older buildings breathe. Modern airtight construction traps moisture-laden air indoors with nowhere to go. So renovating for energy efficiency without adding mechanical ventilation can transform a dry home into a damp one within a single winter.
“Interstitial condensation is the ghost of building pathology — it causes serious structural damage while remaining completely invisible to the homeowner. The fix is never just waterproofing; it’s about understanding vapor drive and controlling the dew point within the wall assembly itself.”
Dr. Sandra Nkosi, Building Science Consultant and Certified Indoor Environmental Hygienist
How Much Indoor Moisture Are You Actually Generating Every Day?
This is where most people underestimate the scale of the problem. A typical household of four generates between 10 and 15 liters of water vapor per day just through normal activities — no unusual weather, no flooding, just cooking, showering, breathing, and doing laundry. That moisture has to go somewhere. If your ventilation can’t remove it fast enough, relative humidity climbs, and your walls become the unwilling recipients.
| Activity | Moisture Generated (approximate) |
|---|---|
| Cooking (per meal) | 0.5 – 1.5 liters |
| Showering (per person, per day) | 0.2 – 0.35 liters |
| Sleeping (per person, per night) | 0.3 – 0.4 liters |
| Drying laundry indoors (per load) | 1.5 – 2.5 liters |
That laundry figure is the one that surprises people most. A single load of wet clothes hung indoors releases roughly the same moisture as 8 long showers. Yet drying laundry on radiators is exactly what people do more of when it’s cold outside — which is also when windows stay shut and ventilation drops. The behavior and the conditions create a perfect storm, all happening inside the home.
Relative humidity above 70% sustained for extended periods is where wall surfaces begin to accumulate visible condensation. At 80% and above, you’re in mold territory. The threshold for surface mold growth on plaster is a surface relative humidity of 85% — and that surface RH can be significantly higher than the room’s air RH if the wall is cold enough to be near its dew point.
What Is the Dew Point and Why Does It Explain Everything?
The dew point is the air temperature at which water vapor starts condensing into liquid. It’s not a fixed number — it changes depending on how much moisture is in the air. At 20°C room temperature with 60% relative humidity, your dew point sits at about 12°C. Any wall surface below 12°C will collect moisture from that air. That’s not hypothetical; it’s thermodynamics.
Here’s the real-world version: a north-facing bedroom in a mid-terrace house, heated to 19°C but with a relative humidity of 65% because the extractor fan in the bathroom down the hall hasn’t worked in three years. The external wall temperature on a cold morning drops to 10°C. That’s below the dew point. Invisible moisture deposits on the wall surface every night. The occupant notices a persistent cold patch and a faint smell, wipes it down, and it comes back within days. No leak. No crack. Just physics repeating itself.
Improving insulation raises wall surface temperatures, which is why cavity wall and internal wall insulation often eliminates condensation problems — not because it blocks water, but because it keeps the surface warm enough to stay above the dew point. The fix is thermal, not waterproofing.
How Do You Tell the Difference Between Condensation and an Actual Leak?
This distinction matters enormously because the solutions are completely different — and applying the wrong one wastes money while the real problem continues. There are reliable tells if you know what to look for, though it’s worth being honest that some cases genuinely require a professional assessment to confirm.
Condensation tends to appear in predictable locations: corners, north-facing walls, areas behind furniture, window reveals, and surfaces near thermal bridges like wall ties and lintels. Leak-related damp tends to spread from a specific origin point — typically a pipe, a roof joint, or a window seal — and the pattern follows gravity downward. Condensation patterns often spread sideways, following the coldest surface area rather than flowing down.
One practical test: tape a piece of aluminum foil tightly over the damp patch, seal the edges with tape, and leave it for 24 to 48 hours. If moisture forms on the room-facing side of the foil, the water is coming from the air — condensation. If moisture forms between the foil and the wall, it’s migrating through the wall from outside or from a pipe. It’s not foolproof, but it gives you meaningful directional evidence before calling anyone.
Pro-Tip: Before assuming a leak, check your indoor humidity with a basic hygrometer (under $15 at most hardware stores). If your indoor relative humidity sits consistently above 60% during cold months, condensation is almost certainly contributing to your damp wall problem — regardless of whether a leak is also present.
Which Types of Walls Are Most Vulnerable to Moisture Without Leaks?
Not all walls respond to humid air the same way. The construction type, material, and thermal performance determine how quickly a wall reaches its dew point and how well it handles cyclic wetting and drying. Understanding your wall type changes which solutions are worth pursuing.
- Solid masonry walls (pre-1920s brick): High thermal mass but low insulation value means surfaces stay cold for longer. They’re also hygroscopic — they absorb and release moisture — which can mask condensation but also prolongs damp episodes.
- Uninsulated cavity walls: Cold inner leaf, no thermal break. The internal wall surface temperature drops rapidly in cold weather, creating the ideal condensation surface.
- Modern airtight construction: Well-insulated surfaces stay warm, which reduces surface condensation — but trapped humid air creates interstitial condensation risk if vapor control layers aren’t correctly installed.
- Drylined walls (plasterboard on dot-and-dab adhesive): Often the worst offender. Cold air circulates behind the board in the void, chilling the back surface and creating condensation that you’ll never see until the board collapses or mold bleeds through.
- Basement and below-grade walls: Permanently cold ground temperatures keep wall surfaces near or below the dew point for most of the year, even in relatively dry indoor conditions.
What Are the Most Effective Ways to Fix Damp Walls Caused by Humidity?
The fix hierarchy matters here. Throwing a dehumidifier at the problem treats the symptom; understanding the moisture source and the wall’s thermal behavior is how you solve it permanently. Work through these steps in order, because skipping to step four while step one is unaddressed is how people spend money on repeated treatments.
- Identify and reduce moisture sources first. Fix the extractor fans (bathroom fans should vent outside, not into the loft), stop drying laundry indoors, use lids on pots while cooking, and check that tumble dryers are properly exhausted. Reducing generation is always cheaper than removing the excess after the fact.
- Improve ventilation to match the load. Trickle vents, passive stack ventilation, or a whole-house mechanical ventilation with heat recovery (MVHR) system all move moisture-laden air out before it contacts cold surfaces. The appropriate solution depends on your building type and budget — MVHR is ideal for tight modern buildings, passive ventilation works better for older, breathable construction.
- Raise wall surface temperatures through insulation. Cavity fill insulation raises the inner wall surface temperature by 3 to 5°C in many cases, often pushing surfaces above the dew point permanently. Internal wall insulation achieves similar results for solid walls, though it reduces room size and requires careful vapor management.
- Use a dehumidifier as a short-term bridge, not a long-term solution. A well-sized dehumidifier — typically 12 to 20 liters per day capacity for an average home — can bring relative humidity down from 70% to a safer 50% within days, giving you time to implement structural fixes without ongoing wall damage.
- Address thermal bridges specifically. Wall ties, lintels, window reveals, and junctions where internal walls meet external ones are often the coldest points in a room. Targeted insulation patches, warm-edge spacers, and properly insulated window reveals deal with spots that insulating the main wall area misses entirely.
Can Mold Grow on a Wall That Feels Dry to the Touch?
Yes — and this trips people up constantly. Surface mold requires a surface relative humidity of around 85% to germinate, but that surface humidity doesn’t have to feel wet to the hand. At 70% room relative humidity, a wall surface that’s just 3 to 4°C colder than the room air can reach 85% surface RH without ever forming visible condensation droplets. The surface stays dry to the touch while the microscopic conditions for mold are perfectly met.
This explains why mold appears in rooms that people describe as “completely dry.” They’re right — the room feels dry. But the wall behind the wardrobe, which blocks convective airflow and stays 4°C colder than the rest of the room, has been sitting at mold-growing conditions all winter. Moving furniture away from external walls by at least 50mm is one of the simplest and most consistently effective interventions there is, precisely because it allows warm room air to circulate and keeps surface temperatures up.
If you’re already noticing visual mold growth, the surface beneath it almost certainly has deeper moisture — and there may be damp smells that are detectable before visible growth becomes obvious. Mold releases volatile organic compounds (VOCs) called microbial VOCs, or mVOCs, and the musty odor they produce often pre-dates any visible discoloration by weeks. Trust your nose as an early warning system.
Does Heating More Actually Help or Make Damp Walls Worse?
Heating is one of those situations where the answer genuinely depends. Done right, it helps significantly. Done wrong, it makes the problem worse in ways that aren’t immediately obvious.
Raising room temperature increases the air’s capacity to hold moisture, which lowers relative humidity — that’s good. It also raises wall surface temperatures toward and above the dew point — that’s also good. But if you heat one room heavily while leaving adjacent rooms cold, you create a pressure gradient that drives moisture-laden warm air into the unheated rooms, where it hits cold surfaces and condenses. The room you heated stays dry. The hallway, the spare bedroom, and the corner behind the airing cupboard collect that moisture instead.
Low background heating across the whole house — keeping every room above about 15°C even when unoccupied — is consistently more effective at preventing condensation than intermittent high heat in occupied rooms. It’s not always cheaper to run, but it usually costs less than the remediation work that follows uneven heating patterns over several winters.
What Are the Warning Signs That a Damp Wall Problem Is Getting Structurally Serious?
Most condensation-related damp stays at the cosmetic level if caught early — staining, mold on paint, peeling wallpaper. Leave it long enough, and you move into territory that costs real money. Here’s what escalation looks like:
- Plaster bulging or detaching: Repeated wetting and drying cycles cause plaster to lose its key to the masonry beneath. When you press a damp patch and it sounds hollow or flexes, the plaster is already compromised.
- Rust stains tracking down from hidden fixings: Wall ties and lintels corroding from sustained moisture exposure. This is structural, not cosmetic, and corroded wall ties in cavity construction can eventually cause partial outer leaf collapse.
- Persistent mold that returns within two weeks of cleaning: Surface treatment isn’t keeping up with the moisture load. This suggests the underlying wall is staying above 18% moisture content — the threshold where timber starts to decay.
- Efflorescence (white salt deposits) on internal walls: Salts migrating to the surface indicate water movement through the masonry. In a condensation-only scenario this is less common; its presence suggests ground moisture or a genuine penetrating damp source also in play.
What Relative Humidity Level Should You Aim for to Keep Walls Dry?
The target band for indoor relative humidity — the one that keeps walls dry, avoids mold, and doesn’t make the air so dry it irritates your respiratory system — is 40% to 60%. Below 40%, you start getting issues with dry skin, static electricity, and wood shrinkage. Above 60%, you’re accumulating risk on cold surfaces, especially in winter when external temperatures push wall temperatures down.
Fifty percent is the sweet spot. At 50% RH and a room temperature of 20°C, your dew point is approximately 9°C. Wall surfaces would need to drop to single digits before condensation forms — unlikely in a well-heated, insulated home even in severe weather. The math is your friend here: controlling humidity doesn’t just feel better; it changes the physics of whether your walls can get wet at all.
Achieving that consistently means monitoring, not guessing. A decent digital hygrometer with memory function (one that records min/max readings) tells you what your humidity is doing overnight and during activities — not just when you happen to check it. Spot checks miss the peaks, and it’s the peaks that cause the damage.
Conclusion
Damp walls without leaks are fundamentally an air quality problem disguised as a building problem — and that reframe changes everything about how you approach the fix. The homes that stay dry aren’t necessarily the best waterproofed; they’re the ones where occupant behavior, ventilation design, and thermal performance have been aligned so that indoor air never holds more moisture than the building can safely handle. As construction continues to tighten for energy efficiency, the homes most at risk of hidden condensation damage will increasingly be the newest ones — not the oldest. Managing indoor humidity isn’t just a comfort consideration anymore. It’s becoming a building longevity issue that the industry is only beginning to take seriously.
Frequently Asked Questions
Can walls be damp without leaks?
Yes. Indoor moisture is a common cause.
Why are exterior walls damp without leaks?
Because they stay cooler and dry more slowly.
Is dampness without leaks normal?
Often yes, especially seasonally.
Does invisible condensation cause damp walls?
Yes. Repeated invisible condensation is common.
When should damp walls without leaks be investigated further?
When dampness is persistent or spreading.

