
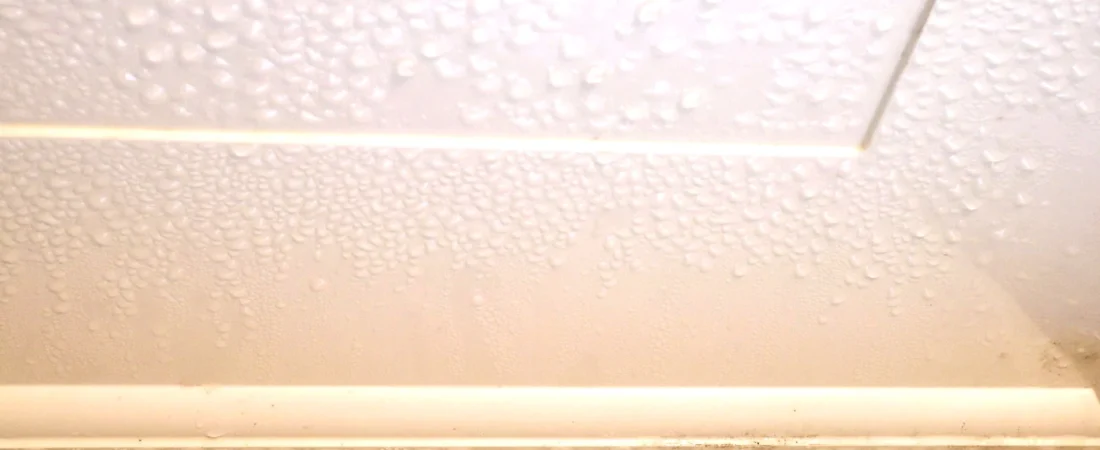
Bottom line: Damp walls near the ceiling are almost never just a “roof leak” — and treating them as one is exactly why the problem keeps coming back. The moisture you see is usually the end point of a longer journey, and until you trace that journey correctly, no patch, paint, or sealant will hold.
Why Do Walls Get Damp Near the Ceiling But Not Lower Down?
The ceiling-wall junction is where warm, moisture-laden air hits the coldest surface in the room — and cold surfaces make air surrender its moisture as condensation. That’s the short version. The longer version is that this corner acts like a trap: heat rises, carries humidity upward, meets the thermal bridge where the roof structure connects to the wall, and deposits water right there.
This is why you’ll often see the dampness appear in winter even when it hasn’t rained. Condensation and water ingress look almost identical from the inside, which is where most DIY diagnoses fall apart. A damp patch that’s worst on the coldest mornings of the year — especially on an external wall — is almost always condensation, not a leak.
The real mechanism worth understanding: insulation in roof spaces and wall cavities is rarely uniform. Wherever there’s a gap, a compressed batt, or a missing section, that spot runs colder than its surroundings. Cold spots attract condensation the way a cold glass attracts moisture on a humid day. The wall near the ceiling is just the most likely place for that cold spot to exist.
What’s the Actual Cause of Damp Walls Near Ceiling?
Here’s the counterintuitive fact that most guides skip entirely: the majority of damp walls near the ceiling are caused by inadequate ventilation and thermal bridging, not by structural water ingress. Yet nine out of ten homeowners — and a surprising number of tradespeople — reach for a roofer first. That misdiagnosis costs hundreds of pounds or dollars before anyone even looks at the real source.
Let’s be honest about the honest nuance here: sometimes it really is a leak. A failed flashing, a cracked render on a parapet wall, or a blocked gutter that’s been overflowing for months can absolutely soak a wall from the top down. But those causes present differently — the damp tends to appear during or immediately after heavy rain, it worsens with weather rather than with temperature, and it’s rarely limited to the coldest corner of the room.
The causes worth understanding in full fall into four distinct categories, and a home can have more than one operating at the same time.
- Interstitial condensation: Warm air from inside the room migrates into the wall or ceiling structure, hits a cold surface within the construction (not just on the face of the wall), and condenses there. You won’t see this happening — by the time you notice the damp patch, it’s been building up inside the structure for weeks. This is common in older homes with no vapour barrier.
- Thermal bridging at the eaves or roof plate: The roof structure sits on top of the wall. That timber or steel element conducts cold from outside directly to the internal surface, creating a reliable cold zone at the ceiling-wall joint. No leak required — just a well-established pathway for heat loss and moisture deposition.
- Roof or parapet water ingress: Failed flashings, cracked mortar on chimney stacks, deteriorated felt under flat roofs, or blocked valley gutters can all direct water to the top of the wall. This type of damp is genuinely structural and won’t improve with ventilation fixes alone.
- Soffit and fascia defects: Water can travel horizontally under the eaves when soffits are cracked or when fascia boards have pulled away from the wall. The water then tracks down inside the wall cavity or directly onto the internal plaster at ceiling level. This one is chronically underdiagnosed because it’s invisible from the outside unless you’re specifically looking for it.
- Bathroom or kitchen extract failure above the ceiling: Extractor fans that vent into the loft space rather than to the outside are a known source of concentrated moisture at ceiling level. The humid air hits cold timber and insulation in the roof void, condenses, and eventually saturates the ceiling and upper wall. It presents identically to a roof leak — and it’s fixed for about £30 in flexible ducting.
How Do You Tell the Difference Between Condensation and a Roof Leak?
The single most useful test costs nothing: watch the timing. Condensation-related dampness worsens during cold snaps and in the mornings after a cold night. Leak-related dampness worsens during or after rainfall, often regardless of temperature. If you can correlate the damp patch with weather events rather than temperature drops, you’re dealing with ingress.
A secondary test: touch the affected plaster. Condensation usually affects a diffuse area and the wall feels cold and slightly clammy but the damp doesn’t penetrate deeply into the structure early on. Water ingress tends to create a more localised, darker patch with a definite wet centre — and if you press the plaster, you may feel actual softness or hear a hollow sound where the plaster has blown from the wall.
Professionals use a pin-type moisture meter to measure moisture content at different depths in the wall. A reading above 20% in plaster strongly suggests active moisture. Comparing readings across seasons gives you trend data that’s genuinely diagnostic — something no visual inspection can match.
“The wall near the ceiling is the most thermally vulnerable point in most domestic construction — it’s where the roof structure bridges the insulation layer and creates a reliable cold zone. Before any remediation, we always ask: does this damp correlate with cold weather or wet weather? That single question eliminates at least half of incorrect diagnoses before we’ve even touched a moisture meter.”
Dr. Rachel Howe, Building Physics Consultant and Fellow of the Chartered Institution of Building Services Engineers (CIBSE)
What Risks Come with Damp Walls Near the Ceiling?
Damp at ceiling level carries risks that are structurally different from damp lower on a wall — and that’s not just a technical distinction, it changes how urgently you need to act. The ceiling-wall joint is load-bearing in many construction types. If moisture is getting into the timber wall plate or the joists where they sit on the wall, the wood softens, rot sets in, and you’re looking at structural repairs rather than cosmetic ones.
Mould follows moisture within 24 to 48 hours under the right temperature conditions, and upper-wall corners are prime mould territory. The spores released by Stachybotrys chartarum — the black mould most associated with persistently damp conditions — can reach concentrations in a poorly ventilated room that exceed safe thresholds within days of visible growth beginning. If you’ve got children or anyone with respiratory conditions in the home, this isn’t a “deal with it in spring” situation.
One scenario that comes up repeatedly: a homeowner notices a small damp patch in the corner of a bedroom ceiling, assumes it’s a minor roof issue, patches the plaster, and repaints. Six months later the patch is back, twice the size, and the loft inspection reveals timber that’s been wet for long enough that white rot has established in the rafters. The repair bill has gone from a few hundred to several thousand. The damp patch was never just aesthetic.
| Risk | Timeframe if Untreated | Severity |
|---|---|---|
| Mould growth on plaster surface | 24–48 hours after moisture reaches threshold | High — health impact, cosmetic damage |
| Plaster blow and delamination | Weeks to months | Medium — repair costs increase significantly |
| Timber rot in roof plate or joists | Months to years | Very High — structural, expensive to repair |
| Electrical hazard (ceiling fittings) | Unpredictable | Critical — moisture near ceiling lights or junction boxes |
Is Mould Near the Ceiling Dangerous and How Should You Handle It?
Yes, and the way most people instinctively deal with it makes things worse. Scrubbing dry mould with a brush scatters spores into the air — you’re inhaling a concentrated cloud of what you’re trying to remove. Do not scrub dry mold; instead, lightly mist the area with water before any cleaning to prevent spore dispersal, wear an FFP2 mask minimum, and work with the windows open and the door to the rest of the house closed.
For surface mould on plaster or paint, a solution of one part white vinegar to one part water applied with a sponge and left for 10 minutes before wiping is genuinely effective against most common mould species — more so than bleach-based products, which kill the surface growth but don’t penetrate the substrate and leave the mycelium in the wall. Bleach also raises surface moisture, which feeds the next growth cycle.
Any mould covering an area larger than about 1 square metre (roughly 10 square feet) should be assessed by a professional. At that scale, the surface growth is almost certainly the visible fraction of a larger colony within the wall or ceiling construction, and surface-only treatment won’t resolve it.
Pro-Tip: Before repainting over a previously mouldy wall near the ceiling, apply a mould-inhibiting primer specifically formulated for high-humidity environments — not just standard anti-mould paint. The primer penetrates the substrate and inhibits regrowth from within; the paint alone sits on the surface and the mould simply grows under it.
What Are the Permanent Solutions for Damp Walls Near the Ceiling?
The word “permanent” deserves some scrutiny here. No single fix is permanent if the underlying cause isn’t correctly identified first. A damp-proof membrane on the inside of a wall won’t stop condensation if the room’s ventilation remains inadequate. Repointing a chimney stack won’t help if the actual source is an extractor fan venting into the loft. Every solution listed below is only permanent relative to the cause it addresses.
That said, here’s what actually works — matched to the correct cause:
- Thermal bridging / condensation: Add insulation at the eaves and ensure continuity between wall insulation and roof insulation. Even a 50mm mineral wool batt tucked into the eaves where the two elements meet can raise the surface temperature of the ceiling-wall junction by 4–6°C, which is often enough to push it above the dew point and stop condensation forming there entirely.
- Ventilation deficit: Upgrade to a continuously running, low-power mechanical ventilation system (MVHR or positive input ventilation) rather than relying on intermittent extractor fans. The key is continuous low-level air exchange — 15 to 20 litres per second background ventilation in a typical bedroom reduces indoor humidity enough to eliminate condensation risk in most cases without any structural changes.
- Roof or flashing defects: These require a qualified roofer and physical repair — no interior treatment will compensate for water actively entering the structure. Get at least two inspections from independent contractors before commissioning work, because flashing repairs in particular are frequently misquoted.
- Soffit and fascia issues: Replace damaged components and ensure all joints are sealed with appropriate flexible mastic. Check that the soffit ventilation slots (if present) are clear and not allowing wind-driven rain to enter — mesh-backed vents prevent this.
- Extractor fan rerouting: Inspect the loft space and confirm any bathroom or kitchen extract duct terminates at the roof, not into the loft void. A properly routed flexible duct with a tile vent at the far end resolves this completely. This is a Saturday morning job for a competent DIYer.
Can You Fix Damp Walls Near the Ceiling Yourself or Do You Need a Professional?
The honest answer: diagnosis almost always benefits from professional input, even if the fix is DIY-level simple. The reason is that the consequences of misidentifying the cause are expensive. A homeowner who spends two weekends improving loft insulation and increasing room ventilation — only to find out the damp was actually from a failed parapet flashing — has lost time and wasted money while the real damage continued.
A damp surveyor or building pathologist (not a damp-proofing company, who have a financial interest in recommending injected damp-proof courses) will charge roughly £200–£400 for a full diagnostic inspection. That fee is almost always recovered in avoided remediation costs. Look for a surveyor with RICS accreditation or membership of the Property Care Association.
Once you know the cause, the scope for DIY is actually quite broad: improving loft insulation, rerouting extractor ducting, cleaning and sealing soffits, and even applying breathable anti-mould treatments are all within reach of someone comfortable with basic tools. Roof repairs and structural timber work are where professional trades are genuinely necessary — not for legal reasons, but because poor roof repairs frequently create new water pathways that are worse than the original problem.
Why Does the Damp Keep Coming Back After Treatment?
Recurring damp near the ceiling after treatment is almost always a sign that the solution addressed a symptom rather than the cause. The most common pattern: someone replasters and repaints the affected area, which looks fine for six to eighteen months, then the patch returns — often darker and larger. What happened in the interim is that the source of moisture continued to deliver water to the structure, and the new plaster simply absorbed it until saturation again.
There’s also a subtler mechanism that rarely gets discussed. When you replaster and dry out a damp wall, you temporarily increase the thermal performance of that surface — dry plaster is a better insulator than wet plaster. The surface temperature rises slightly, which reduces or eliminates condensation at that spot. So for a few months, the wall looks genuinely better, even if nothing structural has changed. Then winter comes, the room’s humidity climbs again, and the cycle resumes.
The only reliable test for whether a treatment has actually worked is to monitor moisture content at the same locations across two full seasonal cycles — one winter and one summer. A declining trend in winter peak readings is the evidence base you’re looking for. Anything less than that is just optimism with a paintbrush.
What Should You Do First When You Notice Damp Walls Near the Ceiling?
Stop the clock on any cosmetic repairs. Repainting or replastering over active dampness traps moisture in the structure and accelerates the damage — it also resets the visible evidence you need for a proper diagnosis. The first 48 hours matter for getting an accurate picture of what you’re dealing with.
Document the damp patch with photos, noting the date and recent weather conditions. Check whether there’s been recent rain or a cold snap. If you have a hygrometer (a basic one costs around £10–£15), measure the indoor relative humidity — anything consistently above 60% is a significant contributor to condensation risk and gives you concrete data to share with a surveyor or contractor.
Go into the loft space if it’s accessible and safe to do so. Look at the insulation at the eaves — is it continuous or does it stop before the edge? Check the underside of the roof felt for staining or drip marks. Look at where any extractor ducts terminate. These five minutes of loft investigation can tell you more than an hour of speculation from inside the room below.
Understanding damp walls near the ceiling properly means accepting that this problem sits at the intersection of building physics, construction quality, and how you actually live in the space — and that no single trade has the full picture. The homes that solve this problem for good are the ones where someone paused long enough to ask why before reaching for the filler. As building standards push toward tighter construction to meet energy targets, the interplay between airtightness, moisture management, and ventilation is only going to become more consequential — getting this right now is practice for a future where the stakes are higher.
Frequently Asked Questions
Why is the damp patch only in the corner?
Corners are “dead zones” for airflow. They are also structural junctions where insulation is often thin or missing, making them the coldest points in the room.
Can I just use bleach to clean it?
No. Bleach is mostly water. While it whitens the surface, the water in the bleach can actually feed the mold roots (mycelium) inside porous plaster, leading to a faster return.
When should I call a professional?
If the damp patch is brown or yellow (water staining) or if the plaster feels soft and “mushy” to the touch, you likely have a structural leak that requires a roofer or a damp-proofing specialist. If you notice that damp patches spread quickly or you suspect structural problems such as faulty guttering, roofing, or issues with the damp-proof course, you should seek professional help. Moisture meters can be used to locate the source of dampness by tracing moisture levels back to their origin. If patches of damp persist after maintenance, you should call a professional damp surveyor.