
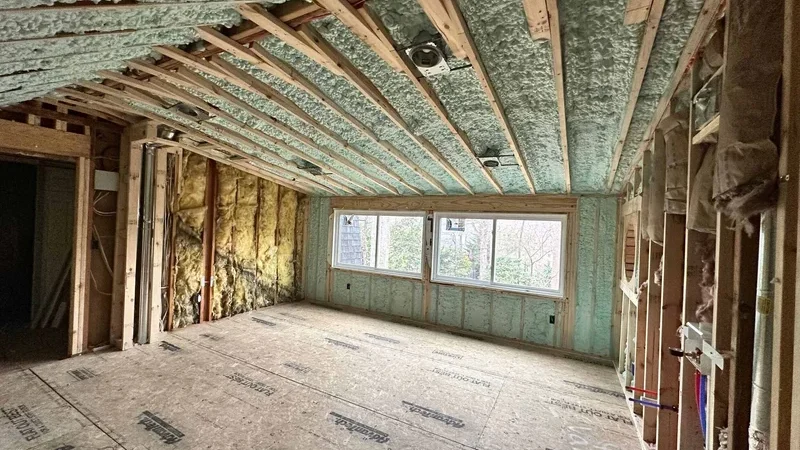
Insulation is supposed to fix your moisture problems — and that’s exactly why damp walls after insulation catches so many homeowners completely off guard. The insulation didn’t fail. It did precisely what it was designed to do: slow the movement of heat. The problem is that slowing heat movement also changes where moisture condenses inside your wall assembly, and if nobody accounted for that shift, you’ve just created the perfect conditions for persistent dampness and mold growth hidden inside your walls.
Why Do Walls Get Damp After Insulation? (The Real Mechanism)
Here’s the part most guides skip: insulation doesn’t create moisture, but it relocates the dew point. Before insulation, the dew point — the temperature at which water vapor turns to liquid — often sat somewhere safe, either inside the heated space or on the exterior surface. Add insulation to the mix, and that dew point shifts deeper into the wall cavity, sometimes landing right on the sheathing or the original masonry face.
Warm, humid interior air is always trying to push toward cooler, drier exterior air. Insulation slows that journey but doesn’t stop it. When vapor-laden air reaches a surface that’s cold enough to trigger condensation, moisture drops out of the air and soaks into whatever material is sitting at that location — usually timber, OSB sheathing, or old brick.
This is why you can have a perfectly installed, perfectly rated insulation product and still end up with wet walls within a single winter season. The insulation itself isn’t the culprit. The culprit is the unchanged vapor dynamics meeting a newly changed thermal profile.
Is the Dampness From Condensation or Water Ingress? How to Tell
Getting this diagnosis right changes everything. Condensation-related dampness tends to be diffuse — you’ll notice a general clammy feel across a large section of wall, often worse in the corners and on north-facing surfaces. Water ingress from outside, on the other hand, usually has a distinct wet patch that tracks back to a specific source: a cracked render, a missing pointing joint, a leaking gutter above.
A simple test: tape a square of aluminum foil (about 30cm × 30cm) tightly to the damp patch and seal all four edges with tape. Leave it for 48 to 72 hours. If the moisture appears on the room-facing side of the foil, you’re dealing with condensation from interior humidity. If moisture collects on the wall-side of the foil, water is migrating through the wall from outside.
Interstitial condensation — the kind that happens inside the wall assembly itself — won’t show up cleanly on this test at all, which is one reason it goes undetected for months. You may notice a musty smell, soft plasterboard, or visible mold at skirting level well before you see any obvious wet patch on the wall face.
What Types of Insulation Are Most Likely to Cause Damp Problems?
Not all insulation materials behave the same way around moisture, and the type you choose has a direct bearing on your risk level. Mineral wool (rock wool and glass wool) is vapor-permeable — it lets moisture pass through slowly, which sounds like a problem but is actually a feature. It allows the wall assembly to “breathe” and dry out when conditions allow.
Rigid foam boards like EPS, XPS, and PIR, on the other hand, have very low vapor permeability. Used on the cold side of a wall without proper detailing, they can act as a vapor barrier in the wrong place, trapping moisture in the structural layer. Spray foam presents a similar challenge — when applied to the underside of roof rafters or against the interior of a solid masonry wall, it seals the structure so effectively that any moisture already present has nowhere to escape.
The counterintuitive fact worth knowing: higher R-value (better thermal performance) doesn’t automatically mean lower moisture risk. A thicker, denser insulation layer that performs brilliantly in heat retention terms can simultaneously push the dew point to a more damaging location if the vapor control strategy wasn’t designed around it.
| Insulation Type | Vapor Permeability | Moisture Risk if Misapplied |
|---|---|---|
| Mineral Wool (Rock/Glass) | High (breathable) | Low to moderate — dries out well |
| Rigid Foam (EPS/XPS/PIR) | Low | High — can trap moisture at boundaries |
| Spray Polyurethane Foam | Very low | High — seals structure, limits drying |
| Cellulose (blown-in) | Moderate | Low if dry-installed, higher if wet-sprayed improperly |
Why Vapor Barriers Are Often Installed Wrong (And What That Does)
The single most common installation mistake that leads to damp walls after insulation is getting the vapor barrier position wrong. In a cold climate, the vapor control layer belongs on the warm side of the insulation — toward the interior of the building. This placement stops warm, moist interior air from reaching the cold zone inside the wall where it would condense.
What actually happens in practice: installers sometimes place vapor barriers on both sides of the insulation, or on the cold (exterior-facing) side, because it seems logical to keep moisture out from all directions. This traps any moisture that does get into the wall assembly with absolutely no escape route, and it will saturate whatever structural material sits between the two barriers.
There’s a second, subtler error that’s even more common than the first. Vapor barriers are installed with gaps — around electrical outlets, pipe penetrations, at junctions with joists or rafters — and those gaps are simply not sealed. A single 1% gap in a vapor control layer can allow 50% of the total vapor that would have passed through the entire layer to bypass it. That’s not a rounding error; that’s a design failure.
“The thermal and hygric performance of a wall assembly are inseparable. When you change one, you’ve automatically changed the other, and the dew point calculation has to be rerun from scratch. Most retrofit insulation projects never do this, and that’s where the moisture problems begin.”
Dr. Helen Forsythe, Building Physics Consultant and Fellow of the Chartered Institution of Building Services Engineers (CIBSE)
Which Wall Types Are Highest Risk for Post-Insulation Dampness?
Solid masonry walls — brick or stone construction without a cavity — are in a different risk category from cavity walls, and it’s worth being clear about why. A solid wall naturally manages moisture through a process called hygric buffering: the dense masonry absorbs moisture during wet periods and releases it slowly during dry ones. Add an impermeable internal insulation layer, and you’ve interrupted that cycle. The wall face can now remain saturated for far longer than it ever did before.
Cavity walls have a different problem. The cavity was originally designed as a moisture break — any water that penetrated the outer leaf would drain harmlessly down the cavity and out through weep holes. Cavity wall insulation, typically blown-in mineral wool or EPS beads, fills that cavity and gives water a route to bridge across to the inner leaf. This is especially problematic in high-exposure locations or where the outer leaf has any existing defects in the pointing.
Timber frame walls sit in their own risk bracket because timber is so moisture-sensitive. A moisture content above 19% in structural timber creates conditions suitable for wood rot, and post-insulation condensation in a timber frame wall can push that threshold in a matter of months if the vapor control strategy isn’t right. This is a scenario where getting things wrong isn’t just a cosmetic issue — it’s a structural one.
How Does Relative Humidity Inside Your Home Affect Post-Insulation Walls?
The interior humidity level you maintain is a direct driver of how much moisture pressure your walls are under. A household generating 10–15 liters of moisture per day — which is entirely normal for a family of four through cooking, bathing, breathing, and laundry — creates a significant vapor pressure gradient that constantly pushes moisture toward the cold external surfaces.
Maintaining interior relative humidity between 40% and 55% dramatically reduces that vapor pressure gradient. At 70% interior RH, the moisture drive toward cold wall surfaces is roughly 4 times greater than at 50% RH. That’s not a minor variable — it’s the difference between a wall assembly that copes and one that stays wet.
After insulation work, many homes actually see interior humidity rise temporarily because the reduced air infiltration (less draughts) means less natural ventilation. You’ve made the building tighter and warmer, but if the ventilation strategy didn’t change alongside the insulation, you’ve just concentrated more moisture inside a more airtight envelope. This is one reason why damp walls following insulation is such a consistent complaint in newly upgraded homes — the ventilation calculation was never revisited.
How to Prevent Damp Walls After Insulation: A Systematic Approach
Prevention here isn’t about one fix — it’s about designing the whole system so that moisture has somewhere to go at every stage. These steps work together, and skipping any one of them undermines the others.
- Run a condensation risk analysis before you start. This means a dew point calculation for your specific wall construction, insulation type and thickness, and your local climate. Free tools like WUFI or even the basic BS EN ISO 13788 method can flag problems before a single board goes up. Most DIY and contractor insulation projects skip this entirely, which is why moisture problems are so predictable afterward.
- Install vapor control on the warm side with zero gaps. The vapor control layer (VCL) goes on the interior-facing side of the insulation in cold and mixed climates. Every penetration — every socket, pipe, light fitting, and joist junction — gets sealed with appropriate tape or wet-applied membrane. Treat it like a waterproof layer because, for vapor, it functionally is one.
- Match the insulation to the wall type. Solid masonry walls usually work better with vapor-open, breathable insulations like woodfibre or mineral wool rather than closed-cell foam. Cavity walls should have their cavities assessed for exposure rating before fill — not all cavity walls are suitable candidates for insulation fill.
- Upgrade ventilation at the same time. Tighter buildings need mechanical ventilation. At minimum, this means background ventilators in each habitable room and intermittent extract fans in wet rooms. Ideally, it means a whole-house mechanical ventilation with heat recovery (MVHR) system that maintains controlled air exchange without the energy loss of open windows.
- Address any pre-existing water ingress before insulating. Insulation does not fix a leaking roof, failed pointing, or a compromised damp proof course. It hides those problems while making them worse. A damp survey before installation is non-negotiable — not a nice-to-have.
What Are the Warning Signs That Post-Insulation Dampness Is Getting Worse?
Catching this early matters enormously because interstitial condensation left unchecked for two or more years can degrade structural timber, corrode metal ties in cavity walls, and create mold colonies that are expensive and disruptive to remediate. Knowing what to look for lets you intervene before the damage reaches that point.
Here’s what to watch for, especially in the first two winters after insulation is installed:
- Musty smell without a visible source — mold growing inside the wall cavity well before it breaks through the surface
- Paint bubbling or wallpaper lifting at skirting level or around window reveals, where cold bridging is most likely
- Soft or springy plasterboard when you press firmly — this indicates moisture saturation of the board, not just surface dampness
- Visible efflorescence (white salt deposits) on masonry — water has been moving through the structure and depositing mineral salts as it evaporates
- Window condensation increasing despite warmer interior temperatures — counterintuitively, this can signal rising indoor humidity from reduced air infiltration post-insulation
Pro-Tip: Invest in a decent hygrothermal data logger (not just a basic thermometer) and place it in the room with your most concerning wall. Logging temperature and relative humidity over a full heating season gives you actual data rather than guesswork. If you’re consistently seeing above 65% RH indoors during cold weather, your walls are under real moisture stress regardless of how the surface looks.
What Should You Do If You Already Have Damp Walls After Insulation?
The honest answer here is that remediation is situation-dependent, and the right fix for a cavity wall with bridging problems is very different from the right fix for a timber frame with an incorrectly positioned vapor barrier. That said, there’s a general sequence that applies in most cases.
Start by confirming the moisture source using the foil test described earlier, and by getting a damp meter reading on the affected wall. A reading above 20% moisture content in timber or above 5% in masonry (using an appropriate meter and calibration) confirms active moisture, not just historical staining. This baseline matters for tracking whether interventions are actually working.
For cavity walls with insulation bridging, the remediation usually involves removing the insulation fill from the affected section — typically the lower meter of wall in high-exposure elevations — and investigating whether the cavity itself has any defects that allowed water to cross to the inner leaf. For internal insulation condensation problems on solid walls, the insulation and vapor control layer often need to be stripped back and redesigned rather than patched. That’s a hard conversation to have after the fact, which is exactly why the upfront condensation risk analysis matters so much.
Does External Wall Insulation (EWI) Reduce the Damp Risk Compared to Internal?
External wall insulation has a genuine thermal and moisture advantage over internal insulation for solid masonry walls, and it’s worth understanding why. When you insulate from the outside, you keep the entire masonry structure within the thermal envelope — it stays warm. A warm wall is above the dew point, which means condensation can’t occur within the masonry layer.
The masonry also retains its hygric buffering capacity because it’s still connected to the warm interior air. You haven’t sandwiched it between two temperature extremes. This is one reason building physicists tend to prefer EWI for solid wall retrofits when the building’s external appearance allows it.
EWI isn’t without its own complications, though. The render system applied over the insulation must be vapor-permeable — if a non-breathable render is used, you create a moisture trap on the cold face of the insulation. The junction between EWI and window reveals, roof overhangs, and ground level also needs careful detailing to avoid creating cold bridges at the very edges of the system, which is where surface condensation and mold growth tend to concentrate.
Does Ventilation Alone Fix Post-Insulation Damp Problems?
Ventilation is not a substitute for correct insulation detailing, but it does meaningfully reduce the vapor pressure load on your wall assembly. A well-ventilated space with 40–55% interior RH puts dramatically less moisture pressure on walls than a stuffy, humid interior at 70% RH.
Think of it this way: if your wall assembly has a vapor control layer with a few small gaps, low interior humidity means very little moisture pushes through those gaps. High interior humidity means a lot of moisture pushes through, concentrates at the cold zone inside the wall, and condenses. Better ventilation gives a poorly detailed insulation installation a fighting chance. It doesn’t make a bad installation good, but it reduces the severity of the consequences.
For rooms where dampness is already established, increasing ventilation while you investigate the underlying cause is a sensible interim measure. A bathroom extract fan upgraded to run continuously at a low rate, or a positive input ventilation (PIV) unit in a central hallway, can reduce interior RH by 10–15 percentage points in a typical semi-detached house — which is enough to slow active condensation while you work out the correct long-term fix.
When Should You Call a Building Pathologist, Not Just a Damp Proofer?
This distinction matters more than most homeowners realize. A damp proofing company typically diagnoses problems through the lens of the solutions they sell — chemical DPC injection, tanking membranes, specialist renders. These products have legitimate applications, but post-insulation condensation problems are almost never fixed by any of them.
A building pathologist or independent building surveyor with hygrothermal experience will approach the problem from a physics standpoint first. They’ll ask about the construction type, the insulation specification, the vapor control strategy, the ventilation provision, and the interior humidity levels before recommending anything. That diagnostic sequence is what leads to fixes that actually work, rather than treatments that mask symptoms while the underlying mechanism continues.
The practical trigger for escalating to specialist advice: if you’ve addressed obvious ventilation and humidity issues and dampness persists through a second heating season, or if you’re seeing soft plasterboard, structural timber that sounds hollow when tapped, or mold growth that keeps returning within 6 weeks of cleaning, the problem is inside the wall assembly and it needs a professional hygrothermal assessment, not another coat of anti-mold paint.
Damp walls after insulation are fixable in virtually every case — but the fix has to address the actual mechanism, not just the visible symptom. The buildings that handle it best aren’t necessarily the ones with the most expensive insulation systems; they’re the ones where the thermal and moisture design were treated as a single integrated problem from the start. As building standards tighten and retrofit programs continue at scale, the industry’s understanding of how to manage moisture in upgraded walls is improving quickly — and the homeowners who understand the underlying physics will always be better equipped to ask the right questions before the insulation boards go up.
Frequently Asked Questions
Why have my walls become damp only after I installed insulation?
The most common reason is the reduction in natural ventilation. Before insulation, older homes often “breathe” through gaps in windows, doors, and porous wall materials. Once you seal the house to keep it warm, you also trap moisture inside (from cooking, showering, and breathing). If this moisture cannot escape, it condenses on the coldest available surfaces.
What is the “Dew Point,” and why does it matter?
The Dew Point is the temperature at which air can no longer hold water vapor, causing it to turn into liquid water.
– Correct Insulation: Moves the dew point outward into the insulation layer, keeping the structural wall warm and dry.
– Incorrect Insulation: If the insulation is too thin or placed on the inside, the dew point may fall inside the wall itself, leading to “interstitial condensation” (moisture trapped hidden behind the surface).
Does dampness mean the insulation material is faulty?
Not necessarily. It usually indicates a system failure rather than a material defect. Common issues include:
– Using non-breathable materials (like EPS) on walls that require vapor permeability.
– Thermal bridging (gaps in insulation where cold spots form).
– Inadequate ventilation systems to handle the new airtight environment.
Is internal or external insulation better for preventing damp?
External Wall Insulation (EWI) is generally superior for preventing damp. It wraps the building in a continuous “blanket,” keeping the internal structure warm. Internal insulation is riskier because it leaves the outer wall cold, increasing the chance of condensation forming between the old wall and the new insulation.
How can I improve ventilation without losing the heat I’m trying to save?
To balance energy efficiency with dry walls, consider:
– MVHR Systems (Mechanical Ventilation with Heat Recovery): These extract stale, moist air and replace it with fresh filtered air, recovering up to 90% of the heat.
– Positive Input Ventilation (PIV): A system that encourages a constant flow of fresh air throughout the home.
– Trickle Vents: Small vents in window frames that allow background ventilation.
Can I insulate a wall that is already damp?
No. Never insulate over existing dampness. You must first identify the source—whether it is rising damp, a leaking pipe, or penetrating rain. Insulating over a wet wall will trap the moisture, potentially causing structural rot and a massive mold breakout behind your new panels.
What are the first signs of moisture problems I should look for?
– A musty or earthy smell in corners or behind furniture.
– Water droplets forming on windows (especially in the morning).
– Black spot mold (Aspergillus niger) appearing on North-facing walls or in upper corners.
– Peeling wallpaper or bubbling paint.